Wednesday, 26 June 2013

And so there were ducks!

Living here in Spain, for 5 years now (wow time does fly.) We have never once seen duck eggs for sale. Finding a duck here in the supermarket is hard going too. We both love duck meat and so the natural progression from chickens to turkeys! to ducks just happened in early April of this year.
We haven't had the ducks long enough for me to say we are massively knowledgeable about duck husbandry but I just wanted to give you a run down of our journey so far!

In March 2013 we decide to build a duck pond. We knew that we wanted to keep ducks for meat and eggs, for our own consumption. We had also read that all ducks (except the Muscovy) need water to breed. Since we wanted them for meat, we obviously want them to produce babies and building a duck pond was the initial step. We spent a couple of days planning the pond, using what we had available, and then started work.

The shepherd had given us a water container and we decided to use this cut in half to make a basic pond. We decided on 2 levels with a little water fall connecting the two halves. We would install a solar pump to enable the water to be moved from the bottom tank to the top tank and so stop the water going stagnant.

 The water container
 Cut in half
 Digging the hole for the container
 First one in place
 Placing rocks around it
 Second half...we wanted this higher than the first
 second half sunk
Building the rocks up around the outside.

In 3 days we had the basis for our pond. We just needed to build in the water fall to connect the two containers and install the pump.
A week later the little garden center shop in the local village had some ducklings in. Kev went down to get some chicken feed and came back with 4 ducklings! So now we had to make them a house and fast!


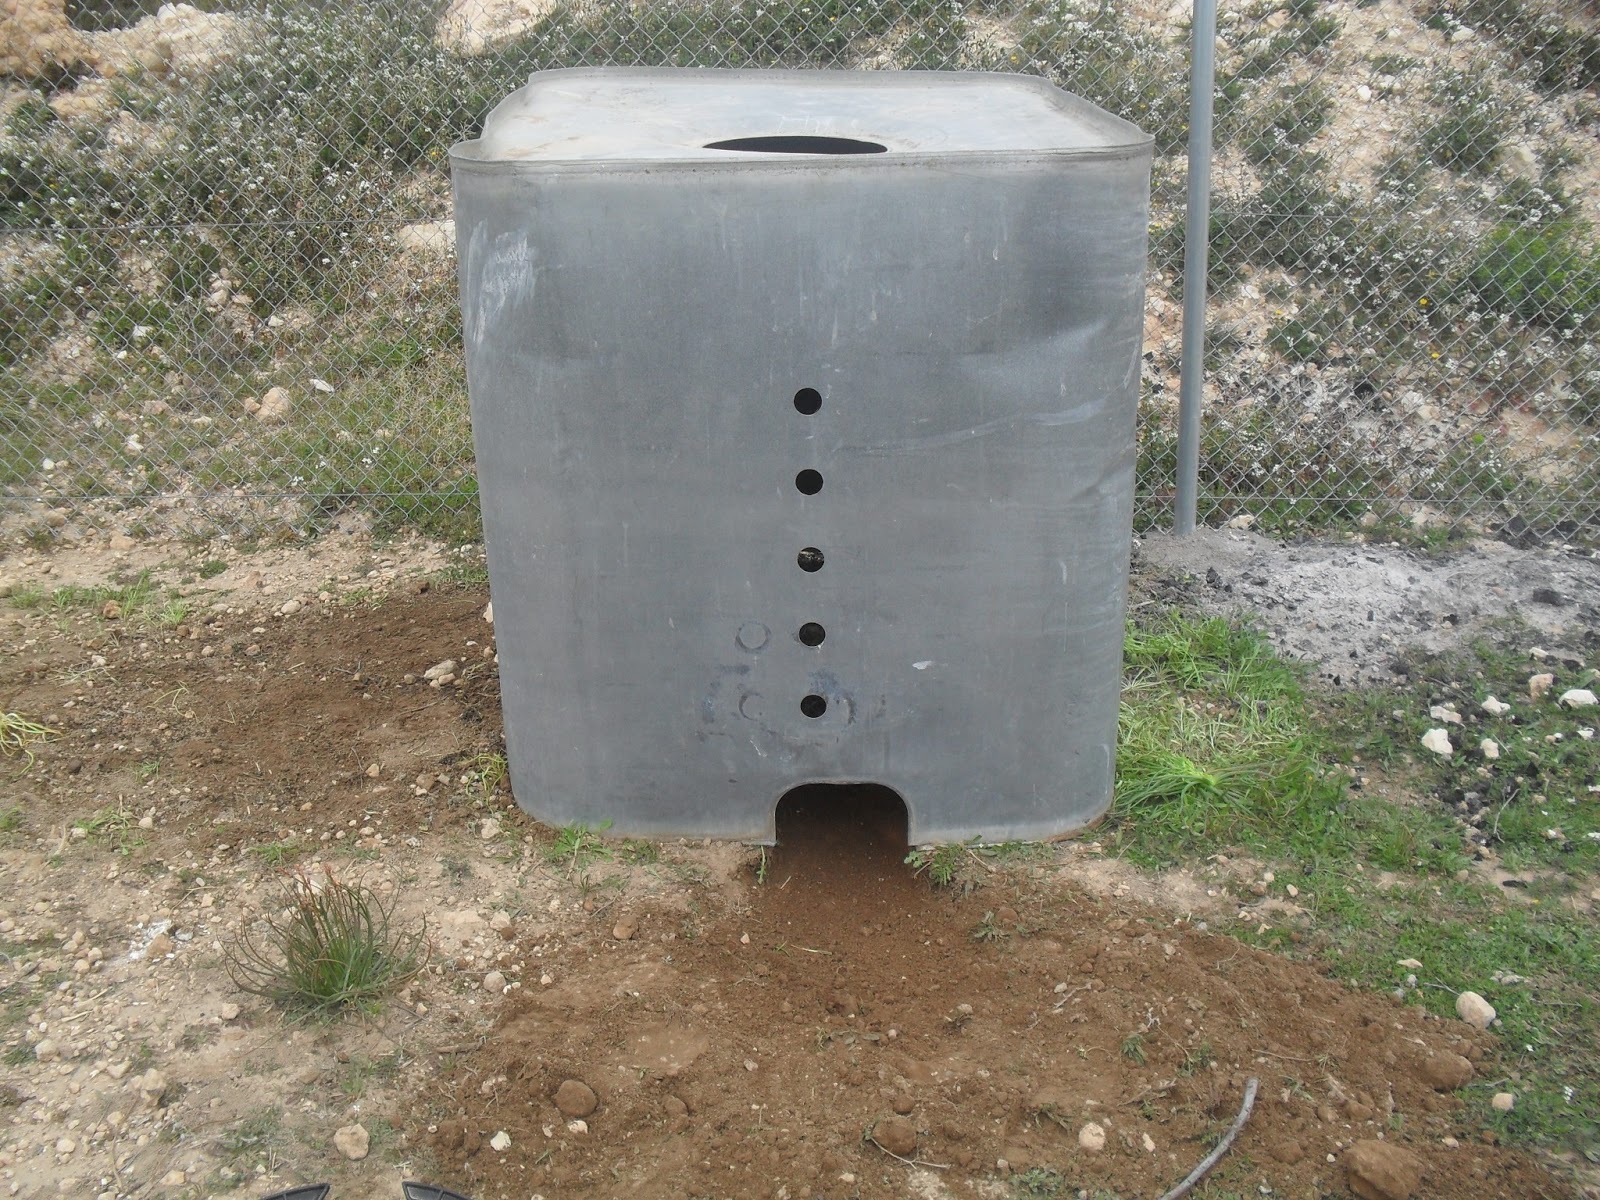
The outside of the water container was metal. We decided to use this as the duck house. A problem with it was it had a big hole in the top and would let the rain in.  We set about trying to fix this problem as this container would make a perfect size duck house.
 We used a water butt lid
Put a pallet on top with this plastic cover

We then had to think about a run for them until they got used to where their new home would be. We took the end off of the rabbit run and pushed it up to the opening. The ducklings had their own water bowl and more importantly the chickens couldn't get to their food.


The ducklings settled in well and within 2 or 3 weeks had grown and changed. We could see after a few days they were putting themselves to bed, so after a week we started to let them out on the land during the day and putting them back in their pen at feeding time.

After about 4 weeks we started to feed them with the chickens. They were now out foraging all day and going back to their house at night. We had the pond almost finished but we need to source a solar pump to enable the water to be moved from one side to the other. The ducks use the pond and love it but we didn't realize how messy they were. They poop every where. So the pond water is now very green and dirty but they still seem to love it.

The ducks grew very fast and soon were as big as the chickens, although they were still wary of them and would move it a chicken came up to investigate. 
We wanted the ducks to be a wild as we could keep them and this is what has happened. We have not tried to pet them and they will move if we go to close to them but at feeding time they will allow us to touch them so we can check on their health. We wanted them wild as I had read that when they get to maturity if they see you as one of the flock they will become aggressive, asserting dominance over you. 

About a month ago a friend rang saying he had 2 ducks that were so noisy he didn't want them anymore, did we want them? So we gained another 2 ducks and then there were 6!
These 2 ducks were very, very wary of us in the beginning. They wouldn't even come at feeding time. After about 3 days they began to understand the routine and were in there with the others at feeding time.

We had real problems with the feeding, ensuring all the animals got their fair share. The chickens are boss and will chase off the ducks if they think they have something the chickens don't. We had to separate them at feeding times to make sure the ducks got their food. Kev built another make shift feeder from drain pipe and flooring sheets. It is fantastic and within 2 days the ducks knew which feeder was theirs. Unfortunately the chickens are not so accommodating!

Even now we have to stand guard at feeding times to fight off the chickens and allow the ducks to eat in peace.
These are the six ducks today, having a rest after their breakfast. They normally stick together, safety in numbers and all that. They seem very happy and we have even set them to work in the garden clearing out the millions of snails this year. They love snails and relished the challenge we set them.  We are hoping next year that they will start laying and raise some ducklings so that duck will be added to the menu in our house.


Sunday, 5 May 2013

Weed Killer

I saw this on the internet (although they used cider vinegar) and just had to see if it worked. We grow everything organically here, so no pesticides or herbicides will be used under any circumstances. We try to companion plant to stop the pests and introduce more of the predators in order to create a natural balance within our garden. Weeds however, are a major problem. I seem to be forever weeding the rock paths, taking the stones out and digging up the roots and then replacing the rocks.
As you can see in the photo the weeds just take over and almost hide the paths. We could have concreted the rocks in but we wanted the garden to look as natural as possible. To find an organic weed killer was just the best find ever...cutting down on the work for me.

This is not a very clear photo but it was sprayed just 4 hours before on a sunny day and you can see the weed is already brown. I was amazed at how quickly and effectively it killed the tops. I sprayed this path once and it stayed clear for almost 3 weeks. Obviously the spray does not kill the roots with just one application perhaps you will need 2 or 3 to actually kill the roots off.

Recipe
10 fluid ounces of any vinegar (I used red wine as that was what I had)
1 table spoon of salt.
Washing up liquid

Instructions
Mix all the ingredients together
Place in a spray bottle
Spray where needed. (It really is that simple)

We use this on the paths to keep the weeds from hiding the rocks. I have found that spraying it in the morning on a fine day will kill the weeds by dinnertime. I just use this for the low growing weeds. I guess it would be just as effective on bigger weeds but the amount you would have to make would be times 10.

Sunday, 7 April 2013

Recycled Strawberry Planters


This was an idea that I saw on the Internet somewhere. It looked fabulous and the more we thought about it the more the idea began to grow.
Here in Casinos in the summer months it is just too hot for the strawberries to survive. These planters allow the water to evaporate  but it then condenses on the top of the bottle again so the soil stays moister for longer.

What you will need.
3 plastic bottle
Scissors
String
Compost
Plants
Take a plastic bottle and cut a hole in it.

Fill with compost to make the bottle stronger


Tie string around the fat end and double knot

Tie another piece of string to it and double knot

Join it to the second bottle string

Tie a piece of string to the neck of the bottle and run it to the second bottles neck

Take another piece of string, tie to the bottle top and at the end make a loop to hang it with

Repeat at the fat end of the bottle...this will be the top bottle

Should look like this

Next we hung them and then tied on the third bottle

Always double knot or more


You can now plant whatever you want to in your bottles. We put in strawberry plants and hung them outside on the wall.
We are planning on using this method for all our strawberry runners as we can fix yogurt pots to the bottle while the runners root and then plant straight into the bottles.

Friday, 5 April 2013

Home-made Furniture Polish

Kev was out collecting wood one day when he came across 2 abandoned bee hives. Kev being Kev, could not resist bringing them home. When we looked inside we found beeswax! I had wanted to use beeswax to make candles and cheese wax too but could not find it to buy here. The fact that Kev had found some was a bit of a bonus!

The first thing I wanted to know was if you could use olive oil with the wax. All of the research I did said to add essential oils, coconut oil or other oils I didn't have. I couldn't find one page that used just olive oil. With us having a crop of olives every year and a free supply of oil it made sense for us to use it and not to have to buy other oils. I just decided to suck it and see.

I used 6 tablespoons of grated beeswax, put this into a glass jar in a pan of boiling water. I had read that beeswax is very, very flammable and so should NEVER be heated in a single pan. I don't know how true this is but I didn't really want to risk it.  If you decide to do this, keep in mind what ever you melt the wax into will not be able to be used for anything else. This is the reason we used a jam jar.
In the following picture I have moved onto making larger amounts but you get the idea.


Pan with a little water


Heat the wax in the pan of water

The wax was melted and I added 8 tablespoons of olive oil to it. When you add the oil the wax sets instantly as the cold from the oil hardens the wax again. You need to keep heating it and stirring to make sure the 2 mix well. When all the lumps have melted you can pour the mixture into a container. I used an old boot polish tin for my first lot.


As you can see this is very dark, it was because the wax was not cleaned properly. You can also see that it is almost runny. It works brilliantly on dark wooden furniture and I have even cleaned my brown leather boots with it.

I decided that I didn't want it so runny, I wanted a set polish. I used the same method as above but only added 6 tablespoons of oil to it. This set firmer. It is still easy to use with a cloth but you seem to use less because it is firmer.

The bonus that came from using this is that the polish is very good for your hands too. When I had finished polishing the wood my hands felt like they had been creamed, very smooth and supple!

Wednesday, 3 April 2013

Recycling...the final chapter...so far!

This blog post is all about the things we needed or wanted and made or used. We tried to make a list of all the different things we have made to make sure we didn't miss any out, but I am sure we have.

One of the things we have used is the 25 litre containers we were given. They come in very handy for moving water around the garden but can also be used  as water feeders for the animals. Kev just cut one in half and fixed some wood to it. This stops the water from tipping up when the chickens climb in it.
This one is now a little pond for the ducklings!

We then moved on to using drain pipe as a water holder for the chickens. This one we use for the chicks we raise. They cannot stand in it as it rolls and scares them. They soon learn to stand at the side and drink.


When the original chickens went out onto the land it was summer and very hot. They had their hen house for shade but we soon realised they very rarely used it. They used to sit under the trees but the almonds by July or August have lost their leaves so not really much shade for them. We set about building them a cave...as we call it...from the previous years prunings. We added some massive root stumps and covered them with branches. The front is open and the back is to the ground but the hens can still see out in all directions. They absolutely love this cave, the Cockerel stands on top and crows and the hens sit underneath.


Changing the subject from the animals we decided to have a go at making soap the old way. For this we needed to make lye. We used the wood ash from the fire and ran hot water through it. We used a bucket with a make shift stopper to allow the water to sit in the wood ash before letting it out into the jar. This allows the water to leach more potassium from the ashes and so in theory makes the lye water stronger. We are still working on the strength of the lye but the bucket works brilliantly.
Bucket with jar to catch the lye

You can see the plug in the bottom of the bucket and the jar of lye we made
 
 
I had been reading on line about solar ovens. We thought that this would be ideal for the summer months when we are not allowed to light the fires. This means that I only have the hob to cook on. We tend to eat lots of salads at this time of the year. A solar oven would allow us to cook more variety. We set about researching how to make our own. All seemed to say 2 cardboard boxes and polystyrene. One day when Kev was out collecting wood he came across this.
 
 
We set about changing it into a solar oven. We used foil and a piece of glass over the whole in the middle. We placed it outside in April and cooked our first meal chorizo and bean stew in it. It was outside all day but when we got back from work at 4pm it was cooked!


We are looking to refine this a little but it works perfectly well in the spring and summer months.

When we first arrived here we had no running water or shower. So Kev used an old mop handle to hold the shower head and fashioned an outdoor shower. The water was put in a tank and the sun heated it up throughout the day and we showered at night! I didn't take any photos of it but here is one of the tank.
Sometimes the water was a little too hot!
 
The project we are working on at the minute is to do with the ducks we want. We needed to make them a safe home to live in at night. A friend brought us an old water container 1000 litres that was broken. It had a metal outside. We took it apart to see what the plastic container inside was like.


We decided to use the metal container as the duck house, and the plastic one as a duck pond! We cut the plastic container in half and sank them in the ground.


We placed rocks all the way around the outside to give the ducks a slope in and out of the pond.

We are going to build this up and lay flat stones on the top to hide the container. We will run drainpipe from one to the other and plan to hook up a small 12 volt pump to a battery and small solar panel. This is to aerate the water and hopefully breed bugs and things for the ducks to eat.

Here is a photo of their finished duck house. We filled it with straw to keep them warm. We put a palette on the top and a plastic cover to allow the water to run off in the rain. We now have 4 little ducklings waiting to go in it!
 
We love building stuff out of nothing. It is quite inspiring to see your ideas come to fruition and actually work. We have loads of ideas for the future of things we want or need and I am sure we will get to making them all!